|
|
|
|
|
The Garage Screen

The Garage Screen
Every player is allowed up to five tanks in your garage upon signing up. But if you want more, you may purchase additional slots for 300 gold each. You can purchase more than just one slot, as the list of tanks at the bottom can scroll to the right and left. Your starting tanks, which is the MS-1, Leichtrakttor and T1-Cunningham are very special tanks in that you don't need to buy them, and they don't cost you anything to repair after a battle.
The Garage Screen is where you will equip your tank, but I will start by explaining the common interface first which is shown on practically every screen.
| 1. |
 |
Shows the number of players online. And the number of current battles. |
| 2. |
 |
The vehicle name and type. The badge above the vehicle name indicates Elite Status. A vehicle achieves Elite Status when all research options in its tree is unlocked.
With Elite Status, since all research options have been unlocked, you no longer need any research points. Therefore any experience points you earn on this vehicle can be used for two purposes.
- You can use the experience points to Speed Up Crew Training.
- Or you can transfer the experience points to Free Experience.
More on these two will be explained later. Just read on and they will all be explained on this page.
|
| 3. |
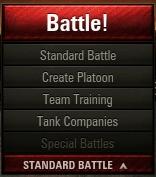 |
There are five options in the drop down list:-
- Standard Battle. This is the normal default option used to go into battle with other players.
- Create Platoon. Only available to Premium Account users. Allows you to invite up to three players to fight in battles together. Creating a platoon allows you to play with your friends. The player limit is 3 players per platoon.
- Team Training. Enters the training room where you can create a training battle. The main difference with a Standard Battle is that it doesn't award any experience or credits, and vehicle repairs are free. But you still need to pay for ammunition used. Training battles are great for experimenting with the game mechanics or exploring the map.
- Tank companies. Available only to Premium Account users. Tank companies allow you to handpick complete teams of players to fight a battle. Experience and credits are awarded and functions like a Standard Battle.
- Special Battles. You can see this option is currently grayed out. You must belong to a clan, and it will be available only ten minutes before a scheduled Clan Battle. Clicking this button will bring you to the Clan Battle screen. It looks similar to the Tank Companies screen.
You'll notice a few of the options are available only to Premium Account users. You can buy a Premium Account with Gold, and Gold is bought by real money.
|
| 4. |
 |
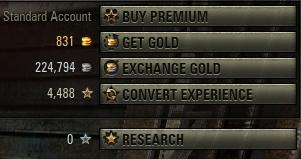
You can see your account type along with your gold, credits, free tank experience and research points here. For a detailed explanation on gold, credits, experience and research points, please see Game Currency.
The options available here are :-
- Buy Premium. Click this button to buy a Premium Account. You pay for it with Gold. Not real gold, but game gold.
- Get Gold. Allows you to buy Gold. Various payment options are available, including credit card and PayPal.
- Exchange Gold. Allows you to convert your gold to credits. 1 gold will get you 400 credits.
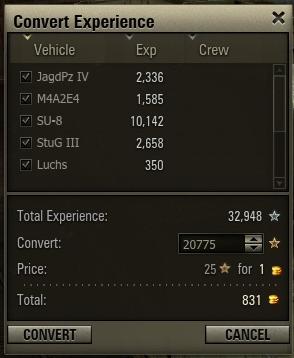
- Convert Experience. When you click on the Convert Experience button, the popup on the left appears. You can see I have 32,948 points I can convert. This is simply experience points earned on Elite vehicles.
This option allows you to transfer experience points gained on elite vehicles to Free Tank Experience. It costs you gold too, so you actually need two things - experience points and gold in order to perform the transfer. For every 25 points transferred, it costs you 1 gold.
This transfer to free tank experience is one of the fastest ways to earn research points for your other vehicles.
- Research. Opens the Research tab. This option is very much self explanatory.
|
| 5. |
 |
This checkbox (positioned above the crew portrait) only appears on vehicles with Elite Status. By checking this checkbox, any experience points earned on this vehicle will be added to "crew experience" in order to speed up crew training. The experience points earned will not be made available for conversion to free tank experience. Recommended to switch this option off.
|
| 6. |
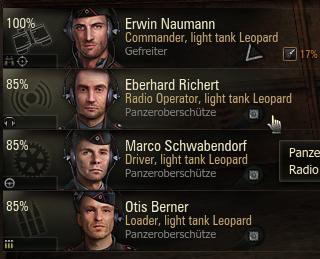 |
The tank crew - in this case the commander, radio operator, driver and loader.
The % numbers shows the crew efficiency. The maximum base value is 100%.
You'll also notice Gefreiter and Panzeroberschutze. That's the crew rank. Gefreiter is the equivalent to Private and Panzeroberschutze is Senior Tank crew. Upon graduation from basic military training, a cadet graduates from Senior Tank crew to Private.
The rank insignia can be seen printed next to the rank.
Crew training, skills and statistics will be given full coverage under The Barracks.
|
| 7. |
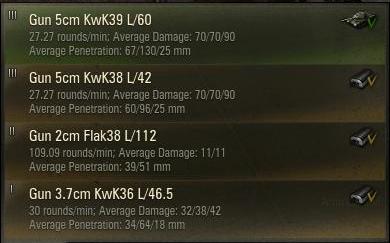 |
Probably the most important section of this screen - the main gun selection. This part is so important, so I'll try to explain the details.
The roman numerals I, II and III are the gun tier. They correspond to the tech tree and the higher the tier, the better the overall quality of the gun.
Along with the gun name, you'll see a summary of the gun stats
- 27.27 rounds/min, Average Damage 70/70/90.
- Average Penetration 67/130/25 mm.
You probably know "27.27 rounds/min" refers to the rate of fire. The higher the number, the quicker you can shoot.
Under Average Damage and Average Penetration are a set of three numbers. Those three numbers correspond to the ammunition type that you are firing. For example, the Leopard is capable of using AP (Armor piercing), APCR (Armor Piercing Composite Rigid) and HE (High Explosive). The numbers simply mean the Average Damage/Penetration you will inflict using the different types of ammunition.
Since I only use AP and HE shells, therefore I only look at the first and third number.
The numbers given are only averages. The actual penetration and damage a shell will cause is expressed in minimum and maximum. To find out the actual numbers, right click on the ammunition type. You will see the image below:-

The minimum and maximum damage and penetration is shown here. In this case, it is 47 mm to 87 mm, so the average works out to (47 + 87) / 2 = 67. This 67 is the average that is shown on the gun selection screen.
These are very important stats to know, because a Tiger's hull armor is 100/80/80. With a maximum penetration of 87, the front armor is completely impervious. And you have a very low chance of penetrating the side armor. Use HE shells if you must engage a Tiger, but it would be better to just save your ammo and move on.
|
| 8. |
 |
These buttons are quite self explanatory for the most - they allow you to select and configure the various armament and fittings on your tank. The fixed fittings are the gun, turret, engine, chassis and radio.
There are three possible types of ammo - AP (armor piercing), APCR (armor piercing composite rigid) and HE (high explosive). Some guns may not use HE ammo, so you won't see HE in this case. But for every gun type, there's a premium ammunition. Premium ammo costs gold - usually upwards from 2 gold per round. They have a higher effectiveness, either with higher penetration or larger splash damage radius (for HE).
The next three slots allow you to mount optional modules on your tank. These modules will affect the characteristics of your tank. You buy them using credits and some modules are not interchangeable. Once mounted, it cannot be removed and placed on another tank. You can still remove it, but doing so will either cost you 10 gold, or it will destroy the module. You are then free to use the slot for something else. The camouflage net however is dismountable without destroying it. To dismount it, just click on the camouflage net, and click on the option to de-mount and it will be placed back in your store. In this example, I have fitted the air filter, camouflage net and spall liner.
The last three slots are used for consumables. This means once used, they must be replenished. See section on optional modules and consumables. My favorite is the Small Repair kit. To use a module during battle, just press the corresponding number. For example, let's say my turret was damaged during battle, then I'd press "4" to activate the repair kit, and then press the number again to select turret. And it would be repaired just for that battle.
|
| 9. |

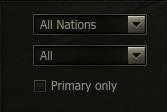 |
You can have an unlimited number of vehicles in your garage. You just need to buy each additional slot for 300 gold each, and the slot is permanent - so once you buy it, you don't need to pay for it again. The arrows on the extreme right and left allows you to scroll left and right.
On the extreme left is the selection box. If you have many vehicles in your garage, you can use this to quickly search for the vehicle you want. You can also mark a vehicle as "Primary". It doesn't mean anything special. Its like a bookmark or favorite. Primary vehicles will appear in your garage first.
|
| 10. |
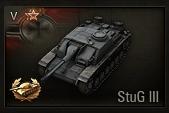 |
The two red stars in the vehicle portrait indicates that you haven't won your first victory in the vehicle for the day.
The first victorius battle of the day on a vehicle is special - you are awarded with twice the experience points.
|
| 11. |
 |
Your player name. The characters in the square brackets is your clan's shortname.
|
| 12. |

At the very bottom are more options bar. You can see "Special Battles", and "CLAN". These will appear only when there is a scheduled clan battle.
|
| 13. |
 |
This button is used for accepting player invites. For example, if you're invited to a platoon, training battle, etc. this button will flash. Click on it to accept or reject the invitation.
|
|


